When a player anticipates the opponent’s ball landing deep or with a lot of spin, the proper preparation and back foot loading is crucial to perform a controlling stroke that will not land short and therefore not giving the opponent chance to approach and finish the point successfully.
Two crucial elements are analyzed in this blog:
1. Positioning to the ball (How to successfully position the body stepping away from the ball)
2. Efficient stroke and recovery (How to successfully create enough power so the trajectory of the ball is deep and controlling while keeping the balance and keeping the recovery potential)
Anticipating the direction the ball while being at the split step above the ground position, lending with the pivot step realizing the direction of the ball begins every stroke in tennis (explained in details in previous blogs).

The following is the cross over step (or steps) to create the efficient loading for the leg drive and creation of the linear momentum. The drive enables the player to create body weight transfer of the hitting side starting from the legs through the ball, giving enough power to the hips and shoulders to begin the powerful rotation (angular momentum).
Left foot stepping up

Stepping back can begin with the simple cross over step over the pivot foot, which is quite fine if you as a player do not need to move too much back or create a lot of power. But for a deep and away of baseline movement, stepping in the front with the non pivot foot first brings such a difference. Firstly, turns the whole body towards the direction of the movement (backward), and secondly creates conditions for a much stronger and wider cross over step comparing to the cross step over the pivot foot which is shorter.
Cross step and wide stance for loading

Stepping in front with the non pivot foot is bringing more powerful planting of the dominant foot to begin the strong and WIDE cross over step backwards and away from the ball.
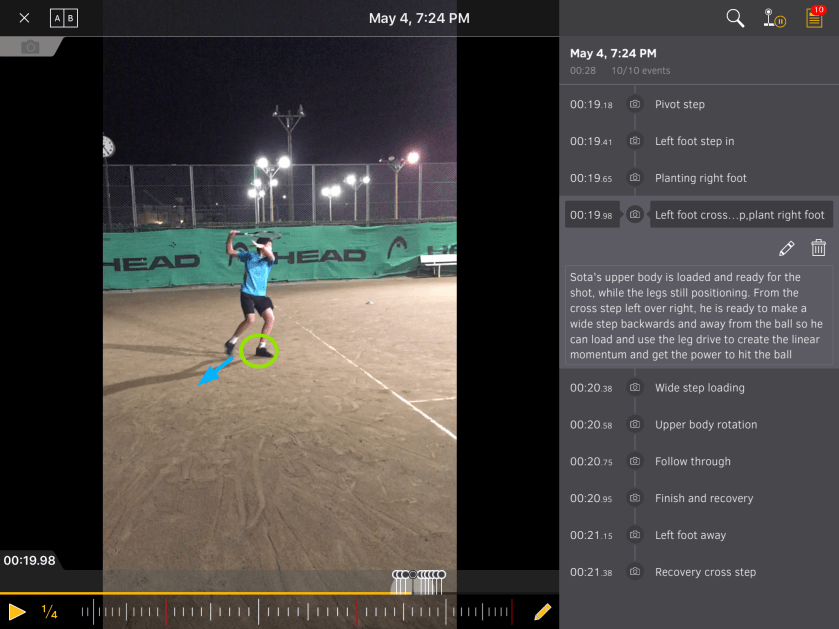
The upper body part is loaded to some point (shoulders), waiting for the legs to stop moving away from the ball and dominant leg to plant just before the stroke. Powerful planting and wide cross over steps are the key to the efficiency of the movement.
Wide step and loading

The final result of the efficiency of the cross over step positioning is showing at this photo. The loading of the dominant leg is at the peak as the feet are very much apart (wide).
This position brings: 1. Perfect body balance before the stroke 2. Maximum loading of the dominant leg and hip for the drive 3. Perfect conditions to transfer the energy from the legs to the hips to shoulders while keeping the perfect balance and body control 4. Body control after the stroke and efficient recovery
Upper body follow through and lower body breakage
The stroke begins with the unloading of the legs through the rotation of the hips and transferring the momentum to the shoulders and wrist. To make sure that the dominant side is moving through the ball (forward) keeping the linear momentum and angular momentum of the hips and shoulders, the non dominant side has to make sure to act as a BRAKE (the brake was explained in the previous blogs).

As the movement was backwards and away from the baseline and the net, a player needs to create a higher angle of the shot and higher and deeper trajectory of the ball while adding the power to the shot. To keep the body transfer forwards (not falling backwards!), at the contact point a player is using the foot of the non dominant leg as a break. Pushing the top of the foot to the front, a player keeps the necessary balance while hitting the ball.

After the contact point as the follow through begins (and the controlling phase of the stroke), it’s all about the angular rotation of the hips and shoulders. What the player wants in this moment is a strong shoulder rotation but very controlled hip rotation. Control of the hip rotation is in the NON DOMINANT HIP, so at this point the BREAK is moving from the top of the foot to the knee and hips. By bending the knee and slightly lifting up and rotating the non dominant foot, the break transfers to the non dominant hip.
Left foot positioning and right foot recovery step
As soon as the hitting arm is at the position where the elbow is in front, the recovery phase begins, so the player wants to use the non dominant leg (relaxing from the breaking position) to open up the space for the dominant leg to perform efficient and timely cross over recovery step. 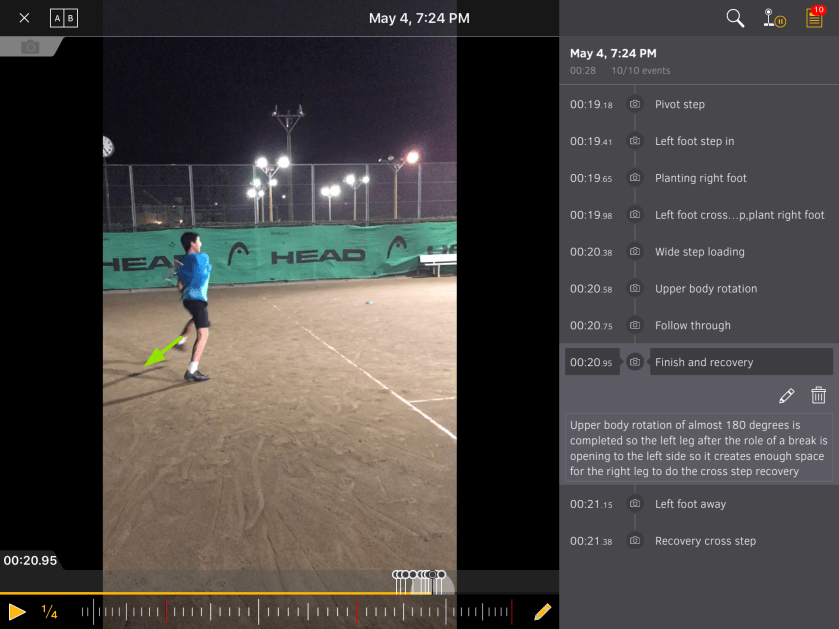 The leg is slightly rotating from the knee and hip to the opposite direction of the dominant leg while still the hitting elbow is up, using the time efficiency. In this way just before the ball lands to the opposite side of the court, while monitoring the opponent’s positioning to the ball, a player is returning to the balanced ready position.

With the left foot away and body weight planting at the same foot, the right foot has enough space for the efficient cross over right over left foot recovery step.

